

Multisig UTXOs with DijetsJs
Introduction
An account on a chain that follows the UTXO model much like Bitcoin doesn't have the commonly found parameter like balance. Instead the UTXO Model has a series of outputs that are generated directly by virtue of the previous transactions. Each output has some amount of asset associated with them. These outputs can have 1 or multiple owners. The owners are basically the account addresses that can consume this output.
The outputs are the result of a transaction that can be spent by the owner of that output. For example, an account has 3 outputs that it can spend, and hence are currently unspent. That is why we call them Unspent Transaction Outputs (UTXOs). So it is better to use the term unspent outputs rather than just outputs. Similarly, we add the amount in the UTXOs owned by an address to calculate its balance. Signing a transaction basically adds the signature of the UTXO owners included in the inputs.
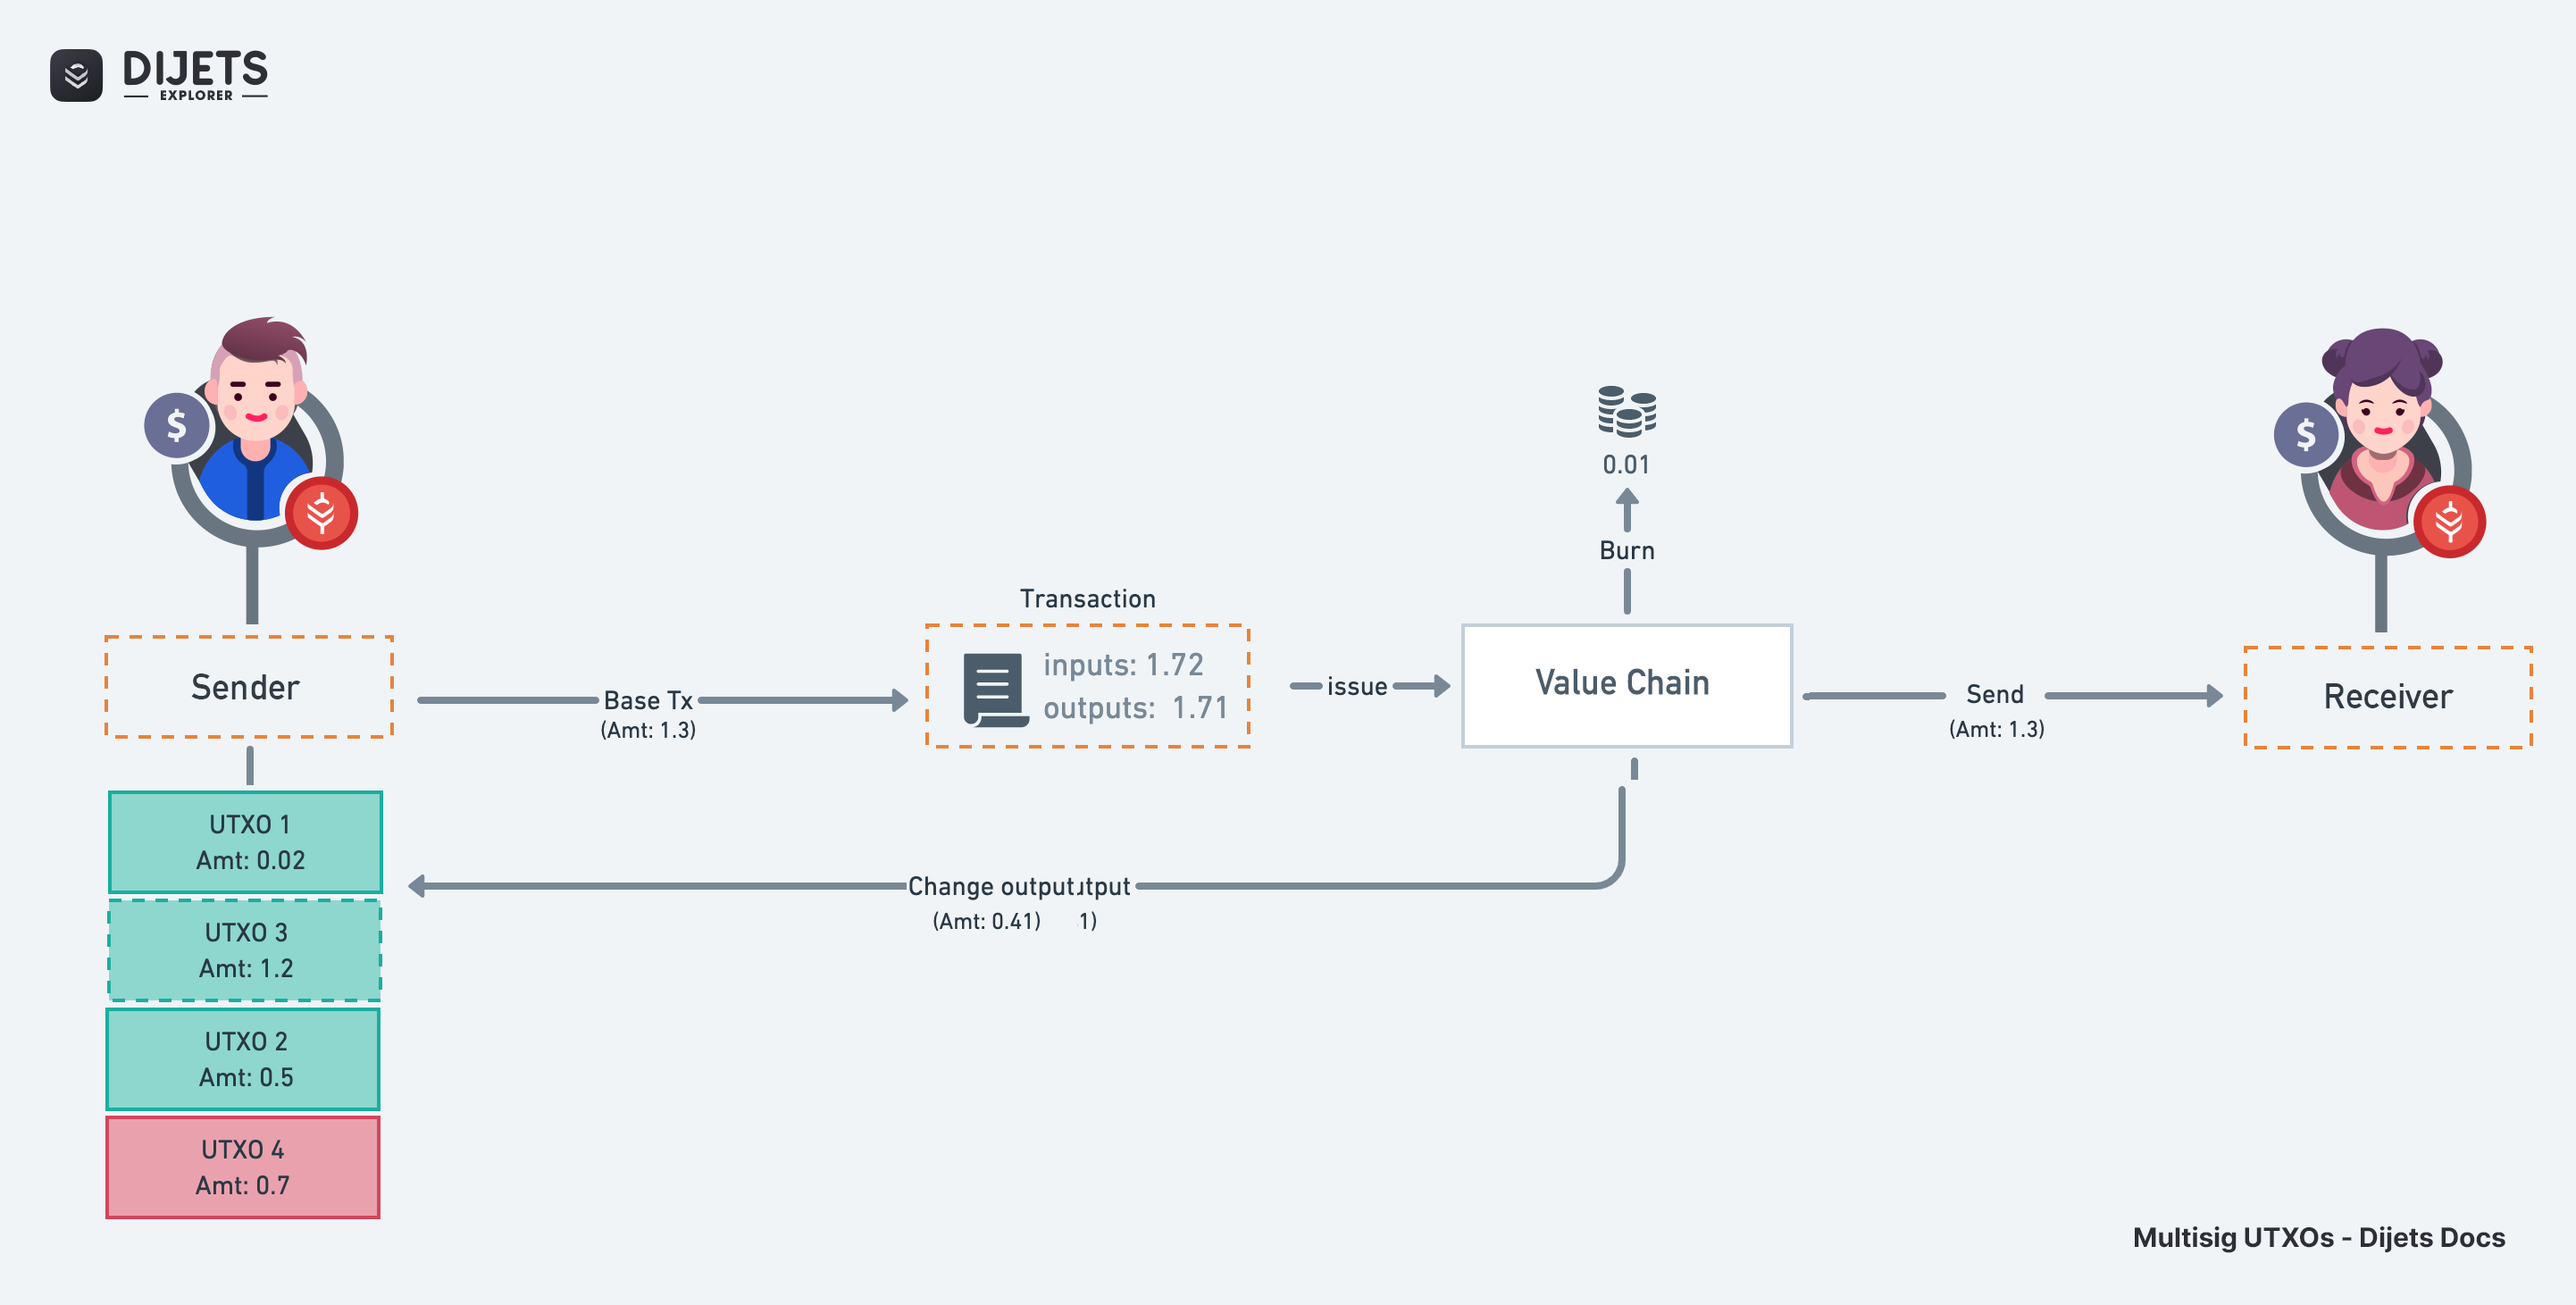
Suppose, account Alice wants to send 1.3 DJT to account Bob, then it has to include all those unspent outputs in a transaction, that are owned by Alice at that point and whose sum of amounts in those outputs is more than or equal to 1.3. These UTXOs will be included as inputs in a transaction. Account Alice also has to create outputs with amount 1.3 and the owner being the receiver i.e Bob. There could be multiple outputs in the outputs array. This means, that using these UTXOs, we can create multiple outputs with different amounts to different addresses.
Once the transaction is committed, the UTXOs in the inputs will be consumed and outputs will become new UTXOs for the receiver. If the inputs have more amount unlocked than being consumed by the outputs, then the excess amount will be burned as fees. Therefore, we should also create a change output which will be assigned to us, if there is an excess amount in the input. In the diagram given below, a total of 1.72 DJT is getting unlocked in inputs, therefore we have also created a change output for the excess amount (0.41 DJT) to the sender's address. The remaining amount after being consumed by the outputs like receiver's and change output, is burned as fees (0.01 DJT).
Multi-Signature UTXOs#
UTXOs can be associated with multiple addresses. If there are multiple owners of
a UTXO, then we must note the threshold value. We have to include signatures
of a threshold number of UTXO owners with the unsigned transaction to consume
UTXOs present in the inputs. The threshold value of a UTXO is set while issuing
the transaction.
We can use these multi-sig UTXOs as inputs for multiple purposes and not only for sending assets. For example, we can use them to create Subnets, add delegators, add validators, etc.
Atomic Transactions#
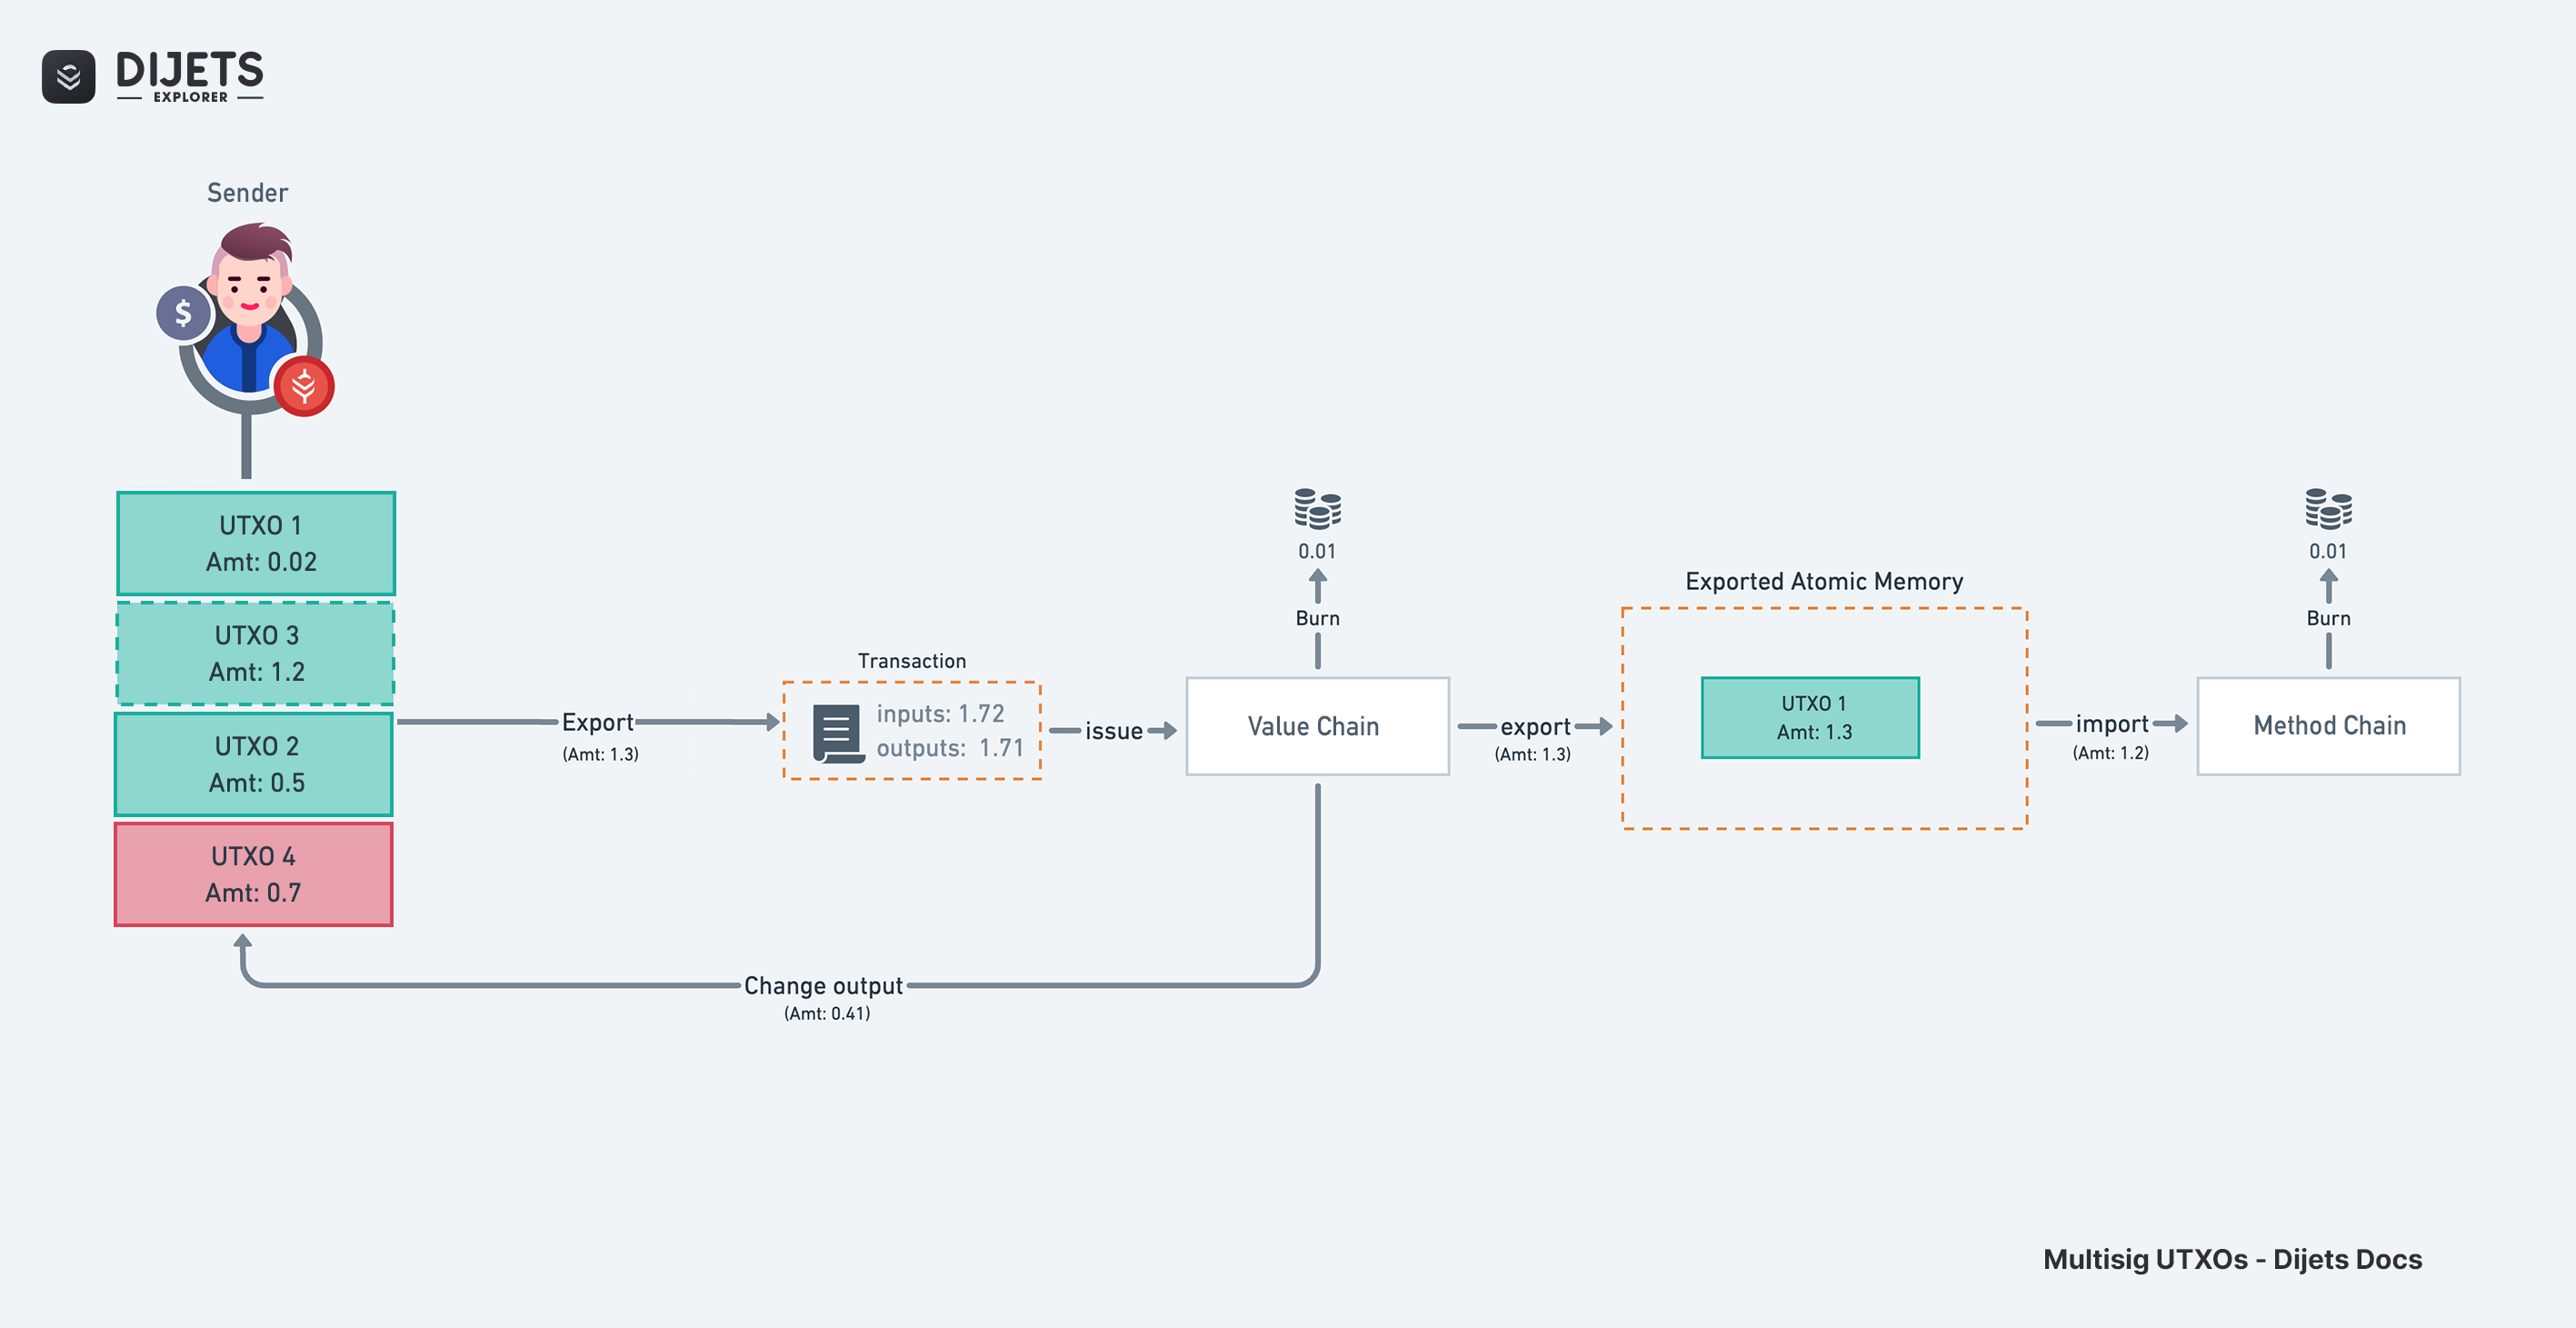
On Dijets, we can even create cross-chain outputs. This means that we can do a native cross-chain transfer of assets. These are made possible through Atomic Transactions. This is a 2-step process -
- Export transaction on source chain
- Import transactions on the destination chain
Atomic transactions are similar to other transactions. We use UTXOs of the source chain as inputs and create outputs owned by destination chain addresses. When the export transactions are issued, the newly created UTXOs stay in the Exported Atomic Memory. These are neither on the source chain nor on the destination chain. These UTXOs can only be used as inputs by their owners on the destination chain while making import transactions. Using these UTXOs on the atomic memory, we can create multiple outputs with different amounts or addresses.
UTXOs on Utility Chain#
Dijets Utility Chain is an instance of Ethereum Virtual Machine. Unlike the Value and Method Chain, UTXOs can't be created on Utility Chain to do regular transactions because Utility Chain follows the account-based approach of Ethereum. In Utility Chain, each address (account) is mapped with its balance, and the assets are transferred simply by adding and subtracting from this balance using the virtual machine.
But we can export UTXOs with one or multiple owners to Utility Chain and then import them by signing the transaction with the qualified spenders containing those UTXOs as inputs. The output on Utility Chain can only have a single owner (a hexadecimal address). Similarly while exporting from Utility Chain to other chains, we can have multiple owners for the output, but input will be signed only by the account whose balance is getting used.
Getting Hands-on Multi-Signature UTXOs#
Next, we will make utility and other helpful functions, so that, we can use them to create multi-sig UTXOs and spend them with ease. These functions will extract common steps into a function so that we do not have to follow each step every time we are issuing a transaction.
Setting Up Project#
Make a new directory multisig for keeping all the project codes and move
there. First, let's install the required dependencies.
_10npm install --save dijets dotenv
Now create a configuration file named config.js for storing all the pieces of
information regarding the network and chain we are connecting to. Since we are
making transactions on the Dijets TestNet, its network ID is 5. You can change the
configuration according to the network you are using.
_10require("dotenv").config()_10_10module.exports = {_10 protocol: "https",_10 ip: "dijets.ukwest.cloudapp.azure.com",_10 port: 443,_10 networkID: 5,_10 privateKeys: JSON.parse(process.env.PRIVATEKEYS),_10 mnemonic: process.env.MNEMONIC,_10}
Create an .env file for storing sensitive information which we can't make
public like the private keys or the mnemonic. Here are the sample private keys,
which you should not use. You can create a new account on Dijets
Wallet and paste the mnemonic here for
demonstration.
_10PRIVATEKEYS=`[_10 "PrivateKey-ewoqjP7PxY4yr3iLTpLisriqt94hdyDFNgchSxGGztUrTXtNN",_10 "PrivateKey-R6e8f5QSa89DjpvL9asNdhdJ4u8VqzMJStPV8VVdDmLgPd8a4"_10]`_10MNEMONIC="apple chair appear..."
Setting Up APIs and Keychains#
Create a file importAPI.js for importing and setting up all the necessary
APIs, Keychains, addresses, etc. Now paste the following snippets into the file.
Importing Dependencies and Configurations#
We need dependencies like the DijetsJs module and other configurations. Let's import them at the top.
_21const { Dijets, BinTools, BN } = require("dijets")_21const Web3 = require("web3")_21_21const MnemonicHelper = require("dijets/dist/utils/mnemonic").default_21const HDNode = require("dijets/dist/utils/hdnode").default_21const { privateToAddress } = require("ethereumjs-util")_21_21// Importing node details and Private key from the config file._21const {_21 ip,_21 port,_21 protocol,_21 networkID,_21 privateKeys,_21 mnemonic,_21} = require("./config.js")_21_21let { djtxAssetID, chainIDs } = require("./constants.js")_21_21// For encoding and decoding to CB58 and buffers._21const bintools = BinTools.getInstance()
Setup Dijets APIs#
To make API calls to the Dijets network and to its Ternary Chain Ledgers of Value Chain, Method Chain and Utility Chain, let's set up these by adding the following code snippets.
_10// Dijets instance_10const dijets = new Dijets(ip, port, protocol, networkID)_10const nodeURL = `${protocol}://${ip}:${port}/ext/bc/C/rpc`_10const web3 = new Web3(nodeURL)_10_10// Method and Djtx API_10const platform = dijets.MethodChain()_10const djtx = dijets.ValueChain()_10const evm = dijets.UtilityChain()
Setup Keychains with Private Keys#
In order to sign transactions with our private keys, we will use the DijetsJs keychain API. This will locally store our private keys and can be easily used for signing.
_12// Keychain for signing transactions_12const keyChains = {_12 x: djtx.keyChain(),_12 p: platform.keyChain(),_12 c: evm.keyChain(),_12}_12_12function importPrivateKeys(privKey) {_12 keyChains.x.importKey(privKey)_12 keyChains.p.importKey(privKey)_12 keyChains.c.importKey(privKey)_12}
We can either use mnemonic phrases to derive private keys from it or simply use just the private key for importing keys into the keychain. We can use the following function to get private keys from the mnemonic and address index which we want. For the purpose of this guide, we will use addresses at index 0 and 1.
_18function getPrivateKey(mnemonic, activeIndex = 0) {_18 const mnemonicHelper = new MnemonicHelper()_18 const seed = mnemonicHelper.mnemonicToSeedSync(mnemonic)_18 const hdNode = new HDNode(seed)_18_18 const dijetsPath = `m/44'/120'/0'/0/${activeIndex}`_18_18 return hdNode.derive(dijetsPath).privateKeyCB58_18}_18_18// importing keys in the key chain - use this if you have any private keys_18// privateKeys.forEach((privKey) => {_18// importPrivateKeys(privKey)_18// })_18_18// importing private keys from mnemonic_18importPrivateKeys(getPrivateKey(mnemonic, 0))_18importPrivateKeys(getPrivateKey(mnemonic, 1))
Setup Addresses and Chain IDs#
For creating transactions we might need addresses of different formats like
Buffer or Bech32 etc. And to make issue transactions on different chains we
need their chainID. Paste the following snippet to achieve the same.
_37// Buffer representation of addresses_37const addresses = {_37 x: keyChains.x.getAddresses(),_37 p: keyChains.p.getAddresses(),_37 c: keyChains.c.getAddresses(),_37}_37_37// String representation of addresses_37const addressStrings = {_37 x: keyChains.x.getAddressStrings(),_37 p: keyChains.p.getAddressStrings(),_37 c: keyChains.c.getAddressStrings(),_37}_37_37djtxAssetID = bintools.cb58Decode(djtxAssetID)_37_37chainIDs = {_37 x: bintools.cb58Decode(chainIDs.x),_37 p: bintools.cb58Decode(chainIDs.p),_37 c: bintools.cb58Decode(chainIDs.c),_37}_37_37// Exporting these for other files to use_37module.exports = {_37 networkID,_37 platform,_37 djtx,_37 evm,_37 keyChains,_37 djtxAssetID,_37 addresses,_37 addressStrings,_37 chainIDs,_37 bintools,_37 web3,_37 BN,_37}
We can use the above-exported variables and APIs from other files as required.
Creating Utility Functions#
While creating multi-sig transactions, we have a few things in common, like
creating inputs with the UTXOs, creating outputs, and adding signature indexes.
So let's create a file named utils.js and paste the following snippets that we
can call every time we want to do a repetitive task.
Getting Dependencies#
Inputs and outputs are an array of transferable input and transferable output. These contain transfer inputs and associated assetID which is being transferred. There are different types of transfer inputs/outputs for sending assets, minting assets, minting NFTs, etc.
We will be using SECPTransferInput/SECPTransferOutput for sending our assets.
But since we can't use UTXOs on Dijets EVM instance, the Utility Chain, we cannot directly import them either.
Therefore we need to create a different type of input/output for them called
EVMInput/EVMOutput.
_28const { BN, chainIDs, web3 } = require("./importAPI")_28_28let SECPTransferInput,_28 TransferableInput,_28 SECPTransferOutput,_28 TransferableOutput,_28 EVMInput,_28 EVMOutput_28_28const getTransferClass = (chainID) => {_28 let vm = ""_28 if (chainID.compare(chainIDs.x) == 0) {_28 vm = "avm"_28 } else if (chainID.compare(chainIDs.p) == 0) {_28 vm = "platformvm"_28 } else if (chainID.compare(chainIDs.c) == 0) {_28 vm = "evm"_28 }_28 return ({_28 SECPTransferInput,_28 TransferableInput,_28 SECPTransferOutput,_28 TransferableOutput,_28 EVMInput,_28 EVMOutput,_28 index,_28 } = require(`dijets/dist/apis/${vm}/index`))_28}
Different chains have their own implementation of TransferInput/Output classes.
Therefore we need to update the required modules according to the chain we
issuing transactions on. To make it more modular, we created a
getTransferClass() function, that will take chainID and import modules as
required.
Creating Transferable Output#
The createOutput() function will create and return the transferable output
according to arguments amount, assetID, owner addresses, lock time, and
threshold. Lock time represents the timestamp after which this output could be
spent. Mostly this parameter will be 0.
_10const createOutput = (amount, assetID, addresses, locktime, threshold) => {_10 let transferOutput = new SECPTransferOutput(_10 amount,_10 addresses,_10 locktime,_10 threshold_10 )_10_10 return new TransferableOutput(assetID, transferOutput)_10}
Creating Transferable Input#
The createInput() function will create and return transferable input. Input
require arguments like amount in the UTXO, and arguments which identify that
UTXO, like txID of the transaction which the UTXO was the output of, outputIndex
(index of the output in that TX), and qualified signatures (output spenders
which are present in our keychain) whose signature will be required while
signing this transaction.
_17const createInput = (_17 amount,_17 txID,_17 outputIndex,_17 assetID,_17 spenders,_17 threshold_17) => {_17 // creating transfer input_17 let transferInput = new SECPTransferInput(amount)_17_17 // adding threshold signatures_17 addSignatureIndexes(spenders, threshold, transferInput)_17_17 // creating transferable input_17 return new TransferableInput(txID, outputIndex, assetID, transferInput)_17}
Add Signature Indexes#
The createSignatureIndexes() function will add spender addresses along with an
index for each address in the transfer input. While signing the unsigned
transaction, these signature indexes will be used.
By adding signature indexes we are not signing the inputs but just adding a
placeholder of the address at a particular index whose signature is required
when we call the .sign() function on the unsigned transactions. Once the
threshold spender addresses are added, it will exit.
_13const addSignatureIndexes = (addresses, threshold, input) => {_13 let sigIndex = 0_13 addresses.every((address) => {_13 if (threshold > 0) {_13 input.addSignatureIdx(sigIndex, address)_13 sigIndex++_13 threshold--_13 return true_13 } else {_13 return false_13 }_13 })_13}
Create EVM Input#
As explained earlier, we do not have UTXOs on Utility Chain. Therefore we cannot make
regular inputs. The following function createEVMInput() will create the
required input and add a signature index corresponding to the address specified
in the input.
EVM Inputs are required when we want to export assets from Utility Chain. In the
following function, addresses is the array of Buffer addresses but for
Utility Chain Export Transactions, a hex address is also appended at last.
_10const createEVMInput = (amount, addresses, assetID, nonce) => {_10 const hexAddress = addresses.at(-1)_10 const evmInput = new EVMInput(hexAddress, amount, assetID, nonce)_10 evmInput.addSignatureIdx(0, addresses[0])_10_10 return evmInput_10}
Create EVM Output#
The createEVMOutput() function will create EVM output for importing assets on Utility Chain.
_10const createEVMOutput = (amount, hexAddress, assetID) => {_10 return new EVMOutput(hexAddress, amount, assetID)_10}
Update Transfer Class#
Let's make a small function that will call the getTransferClass() according to the chainID.
_11const updateTransferClass = (chainID) => {_11 {_11 SECPTransferInput,_11 TransferableInput,_11 SECPTransferOutput,_11 TransferableOutput,_11 EVMInput,_11 EVMOutput,_11 (index = getTransferClass(chainID))_11 }_11}
Add UTXOs to Inputs#
We have inputs as an array of UTXOs that will be consumed in the transaction.
The updateInputs() function will take UTXOs, addresses whose credentials we
have for signing, assetID and toBeUnlocked that is amount we want to consume.
toBeUnlocked contains everything we want to consume including transfer amount,
fees, stake amount (if any), etc.
We also have a special variable C, that will indicate the type of transaction
which is associated with the Utility Chain. This is required because -
- Export from Utility Chain (C.export == true) - These types of transactions cannot
have UTXOs as inputs and therefore
EVMInputis created. - Import to Utility Chain (C.import == true) - The outputs imported on Utility Chain from exported UTXOs are
EVMOutput.
It will create inputs with the passed UTXOs worth the toBeUnlocked amount. But
if there is a UTXO that when included, will surpass the toBeUnlocked amount,
then it will create a change output with the qualified spenders as their new
owners with the surpassed amount.
This function will return the inputs array containing all the unlocked UTXOs,
change transferable output, and the net balance included in these inputs. Now
add the following function snippet.
_72const updateInputs = async (_72 utxos,_72 addresses,_72 C,_72 assetID,_72 toBeUnlocked,_72 chainID_72) => {_72 // Getting transferable inputs according to chain id_72 updateTransferClass(chainID)_72_72 let inputs = [],_72 changeTransferableOutput = undefined,_72 netInputBalance = new BN(0)_72_72 if (C.export) {_72 const nonce = await web3.eth.getTransactionCount(addresses.at(-1))_72 inputs.push(createEVMInput(toBeUnlocked, addresses, assetID, nonce))_72 } else {_72 utxos.forEach((utxo) => {_72 let output = utxo.getOutput()_72 if (_72 output.getOutputID() === 7 &&_72 assetID.compare(utxo.getAssetID()) === 0 &&_72 netInputBalance < toBeUnlocked_72 ) {_72 let outputThreshold = output.getThreshold()_72_72 // spenders which we have in our keychain_72 let qualifiedSpenders = output.getSpenders(addresses)_72_72 // create inputs only if we have custody of threshold or more number of utxo spenders_72 if (outputThreshold <= qualifiedSpenders.length) {_72 let txID = utxo.getTxID()_72 let outputIndex = utxo.getOutputIdx()_72 let utxoAmount = output.amountValue_72 let outputLocktime = output.getLocktime()_72_72 netInputBalance = netInputBalance.add(utxoAmount)_72_72 let excessAmount = netInputBalance.sub(toBeUnlocked)_72_72 // creating change transferable output_72 if (excessAmount > 0) {_72 if (!C.import) {_72 changeTransferableOutput = createOutput(_72 excessAmount,_72 assetID,_72 qualifiedSpenders,_72 outputLocktime,_72 outputThreshold_72 )_72 }_72 }_72_72 // create transferable input_72 let transferableInput = createInput(_72 utxoAmount,_72 txID,_72 outputIndex,_72 assetID,_72 qualifiedSpenders,_72 outputThreshold_72 )_72_72 inputs.push(transferableInput)_72 }_72 }_72 })_72 }_72 return { inputs, changeTransferableOutput }_72}
Only those UTXOs will be included whose output ID is 7 representing
SECPTransferOutput. These outputs are used for transferring assets. Also, we
are only including outputs containing DJT assets. These conditions are
checked in the following line -
_10if(output.getOutputID() === 7 && assetID.compare(utxo.getAssetID()) === 0 && netInputBalance < toBeUnlocked) {
The following part in the above function creates the change output if the total included balance surpasses the required amount and the transaction is not a Utility Chain export -
_16netInputBalance = netInputBalance.add(utxoAmount)_16_16let excessAmount = netInputBalance.sub(toBeUnlocked)_16_16// creating change transferable output_16if (excessAmount > 0) {_16 if (!C.import) {_16 changeTransferableOutput = createOutput(_16 excessAmount,_16 assetID,_16 qualifiedSpenders,_16 outputLocktime,_16 outputThreshold_16 )_16 }_16}
Export Utility Functions#
Now paste the following snippet to export these utility functions.
_10module.exports = {_10 createOutput,_10 createEVMOutput,_10 updateInputs,_10}
All the utility functions are created.
Create Inputs and Outputs#
Let's create a function that will return the array of sufficient UTXOs stuffed inside an array and necessary outputs like send output, multi-sig output, evm output, change output, etc. This function is basically a wrapper that orchestrates the utility and other functions to generate inputs and outputs from parameters like addresses, asset id, chain id, output arguments (to, threshold and amount), etc.
Now make a new file createInputsAndOutputs.js and paste the following snippets of code inside it.
Importing Dependencies#
We need to import utility functions for creating outputs and inputs with the UTXOs.
_10const { BN, djtx, platform, evm, chainIDs, bintools } = require("./importAPI")_10_10const { createOutput, createEVMOutput, updateInputs } = require("./utils")
EVMInput should be used as inputs while creating an export transaction from
Utility Chain and EVMOutput should be used as outputs while creating an import
transaction on Utility Chain. To make it easier to decide when to do what, let's make
a function checkChain() that will return an object C (described earlier).
_14const checkChain = (chainID, ownerAddress) => {_14 let C = {_14 export: false,_14 import: false,_14 }_14 if (chainID.compare(chainIDs.c) == 0) {_14 if (typeof ownerAddress == "string" && bintools.isHex(ownerAddress)) {_14 C.import = true_14 } else {_14 C.export = true_14 }_14 }_14 return C_14}
For getting UTXOs from an address, let's make another function
getUnspentOutputs(). This function will fetch UTXOs from a given address and
source chain. The sourceChain will be used to fetch exported UTXOs that are
not yet imported. The exported outputs stay in the exported atomic memory. This
parameter will only be used when we want to import assets.
_14// UTXOs for spending unspent outputs_14const getUnspentOutputs = async (_14 addresses,_14 chainID,_14 sourceChain = undefined_14) => {_14 let utxoSet_14 if (chainID.compare(chainIDs.x) == 0) {_14 utxoSet = await djtx.getUTXOs(addresses, sourceChain)_14 } else if (chainID.compare(chainIDs.p) == 0) {_14 utxoSet = await platform.getUTXOs(addresses, sourceChain)_14 }_14 return utxoSet.utxos.getAllUTXOs()_14}
Now for organizing inputs and outputs and adding required signature indexes (not
signatures) for each unspent output, adding change output, etc, we will make a
createInputsAndOutputs() function. Paste the following snippet next.
_61const createInputsAndOutputs = async (_61 assetID,_61 chainID,_61 addresses,_61 addressStrings,_61 outputConfig,_61 fee,_61 sourceChain_61) => {_61 let locktime = new BN(0)_61_61 let C = checkChain(chainID, outputConfig[0].owners)_61_61 let utxos = []_61 if (C.export) {_61 addresses.push("0x3b0e59fc2e9a82fa5eb3f042bc5151298e4f2cab") // getHexAddress(addresses[0])_61 } else {_61 utxos = await getUnspentOutputs(addressStrings, chainID, sourceChain)_61 }_61_61 let toBeUnlocked = fee_61 outputConfig.forEach((output) => {_61 toBeUnlocked = toBeUnlocked.add(output.amount)_61 })_61_61 // putting right utxos in the inputs_61 let { inputs, changeTransferableOutput } = await updateInputs(_61 utxos,_61 addresses,_61 C,_61 assetID,_61 toBeUnlocked,_61 chainID_61 )_61_61 let outputs = []_61_61 // creating transferable outputs and transfer outputs_61 outputConfig.forEach((output) => {_61 let newOutput_61 if (!C.import) {_61 newOutput = createOutput(_61 output.amount,_61 assetID,_61 output.owners,_61 locktime,_61 output.threshold_61 )_61 } else {_61 newOutput = createEVMOutput(output.amount, output.owners, assetID)_61 }_61 outputs.push(newOutput)_61 })_61_61 // pushing change output (if any)_61 if (changeTransferableOutput != undefined && !C.import) {_61 outputs.push(changeTransferableOutput)_61 }_61_61 return { inputs, outputs }_61}
Output config is basically an array of all outputs that we want to create. This excludes the change output because it will be automatically created. It has the following structure.
_14// Regular outputs_14;[_14 {_14 amount: BigNumber,_14 owners: [Buffer],_14 threshold: Number,_14 },_14][_14 // Import to Utility Chain_14 {_14 amount: BigNumber,_14 owners: "hex address string",_14 }_14]
You will learn about these arguments and how we can actually pass this along with other arguments through the examples ahead.
Exporting Functions#
Add the following snippet to export this function.
_10module.exports = {_10 createInputsAndOutputs,_10}
We have created all the utility and helper functions. You can use this project structure to create different types of transactions like BaseTx, Export, Import, AddDelegator, etc. You should have the following files in your project now -
- .env - Secret file storing data like mnemonic and private keys
- config.js - Network information and parsed data from
.env - constants.js - Asset and Chain specific static data
- importAPI.js - Import and setup apis, addresses and keychains
- utils.js - Utility functions for creating inputs and outputs
- createInputsAndOutputs.js - Wrapper of
utility.jsfor orchestrating utility functions.
Follow the next steps for examples and on how to use these functions.
Examples#
Now let's look at the examples for executing these transactions. For example, we
will create a separate examples folder. In order to run the example scripts,
you must be in the root folder where all the environment variables and
configurations are kept.
_10node examples/send.js
Multi-Signature Base TX on Value Chain#
Let's create a base transaction that converts a single-owner UTXO into a
multi-sig UTXO. The final UTXO can be used by new owners of the unspent output
by adding their signatures for each output. Create a new file sendBaseTx.js
and paste the following snippets.
Import Dependencies#
Import the necessary dependencies like keyChains, addresses, utility
functions, UnSignedTx and BaseTx classes etc.
_14const {_14 djtxAssetID,_14 keyChains,_14 chainIDs,_14 addresses,_14 addressStrings,_14 networkID,_14 BN,_14 djtx,_14} = require("../importAPI")_14_14const { UnsignedTx, BaseTx } = require("dijets/dist/apis/avm/index")_14_14const { createInputsAndOutputs } = require("../createMultisig")
Send BaseTx#
Now create the sendBaseTx() function to be called for sending base TX to the network.
_36async function sendBaseTx() {_36 let memo = Buffer.from("Multisig Base Tx")_36_36 // unlock amount = sum(output amounts) + fee_36 let fee = new BN(1e6)_36_36 // creating outputs of 0.5 (multisig) and 0.1 DJT - change output will be added by the function in the last_36 let outputConfig = [_36 {_36 amount: new BN(5e8),_36 owners: addresses.x,_36 threshold: 2,_36 },_36 {_36 amount: new BN(1e8),_36 owners: [addresses.x[1]],_36 threshold: 1,_36 },_36 ]_36_36 let { inputs, outputs } = await createInputsAndOutputs(_36 djtxAssetID,_36 chainIDs.x,_36 addresses.x,_36 addressStrings.x,_36 outputConfig,_36 fee_36 )_36_36 const baseTx = new BaseTx(networkID, chainIDs.x, outputs, inputs, memo)_36_36 const unsignedTx = new UnsignedTx(baseTx)_36 const tx = unsignedTx.sign(keyChains.x)_36 const txID = await djtx.issueTx(tx)_36 console.log("TxID:", txID)_36}
We have created the BaseTx with the following output configuration -
- Multi-sig output of value 0.5 DJT with threshold 2 and owners represented by
addresses.x. The owners are basically an array of addresses in Buffer representation. - Single owner output of value 0.1 DJT.
_12let outputConfig = [_12 {_12 amount: new BN(5e8),_12 owners: addresses.x,_12 threshold: 2,_12 },_12 {_12 amount: new BN(1e8),_12 owners: [addresses.x[1]],_12 threshold: 1,_12 },_12]
Let's discuss the arguments of createInputsAndOutputs() in detail -
assetID- ID of the asset involved in transactionchainID- ID of the chain on which this transaction will be issuedaddresses- Addresses buffer array whose UTXO will be consumedaddressStrings- Addresses string array whose UTXO will be consumedoutputConfig- Array of output object containing amount, owners and thresholdfee- Fee for this transaction to be consumed in inputssourceChain- Chain from which UTXOs will be fetched. Will takechainIDas default.
In the above parameters, if fee is less than the fees actually required for
that transaction, then there will be no surplus amount left by outputs over
inputs because any surplus will be converted into a change output. This can
cause transaction failure. So keep the fees in accordance with the transaction
as mentioned here.
Also, the sourceChain parameter is required for fetching exported UTXOs that
do not exist yet on the destination chain. For non-export/import transactions,
this parameter is not required.
The createInputsAndOutputs() function will return inputs and outputs
required for any transaction. The last element of the outputs array would be
change output. And the order of other outputs will be the same as that in the
outputConfig. Signature indexes corresponding to their owners are already
included in the inputs. We can create an unsigned base transaction using the
BaseTx and UnsignedTx classes as shown above. The .sign() function
basically adds the required signatures from the keychain at the place indicated
by signature indexes.
Once the multi-sig UTXO is created, this UTXO can only be used if we have the
threshold signers in our keychain. The util functions can be tweaked a little
bit to create and return inputs with a part number of signers (less than the threshold). We
can then partially sign the inputs and ask other owners to add signature indices
and sign.
Now call the sendBaseTx() function by adding this line
_10sendBaseTx()
Run this file using node examples/sendBaseTx.js, note the txID in the output,
and look for it in the Dijets Unified explorer.
Export Multi-Sig UTXO From X to Method Chain#
Now we will look into exporting assets from the Value to Method Chain. It will be similar to the BaseTx example, with few differences in output ordering and cross-chain owner addresses.
Make a new file named exportXP.js and paste the following snippets.
Import Dependencies#
This time we will require ExportTx instead of BaseTx class.
_14const {_14 djtxAssetID,_14 keyChains,_14 chainIDs,_14 addresses,_14 addressStrings,_14 networkID,_14 BN,_14 djtx,_14} = require("../importAPI")_14_14const { UnsignedTx, ExportTx } = require("dijets/dist/apis/avm/index")_14_14const { createInputsAndOutputs } = require("../createMultisig")
Send Export Transaction#
Most of the things will be very much similar in this function. You can have a
look at outputConfig, which creates a multi-sig output for addresses on
Method Chain. These addresses will be required for signing importTx on Method Chain.
The fee here will only be for exporting the asset. The import fees will be
deducted from the UTXOs present on the Exported Atomic Memory, a memory
location where UTXOs lie after getting exported but before being imported. If
there is only a single UTXO, then it will be deducted from it.
_46async function exportXP() {_46 let memo = Buffer.from("Multisig Export Tx")_46_46 // consuming amount = sum(output amount) + fee_46 let fee = new BN(1e6)_46_46 // creates mutlti-sig (0.1 DJT) and single-sig (0.03 DJT) output for exporting to P Address (0.001 DJT will be fees)_46 let outputConfig = [_46 {_46 amount: new BN(3e6),_46 owners: [addresses.p[0]],_46 threshold: 1,_46 },_46 {_46 amount: new BN(1e8),_46 owners: addresses.p,_46 threshold: 2,_46 },_46 ]_46_46 // importing fees will be deducted from these our other outputs in the exported output memory_46 let { inputs, outputs } = await createInputsAndOutputs(_46 djtxAssetID,_46 chainIDs.x,_46 addresses.x,_46 addressStrings.x,_46 outputConfig,_46 fee_46 )_46_46 // outputs at index 0 and 1 are to be exported_46 const exportTx = new ExportTx(_46 networkID,_46 chainIDs.x,_46 [outputs.at(-1)],_46 inputs,_46 memo,_46 chainIDs.p,_46 [outputs[0], outputs[1]]_46 )_46_46 const unsignedTx = new UnsignedTx(exportTx)_46 const tx = unsignedTx.sign(keyChains.x)_46 const txID = await djtx.issueTx(tx)_46 console.log("TxID:", txID)_46}
Another point to note is how inputs, outputs, and exportedOutputs are passed here.
- Inputs are as usual passed for the
insparameter of theExportTxclass. - But only
outputs. at(-1)representing change output (last element) is passed in place of the usualoutsparameter. - The last parameter of this class is
exportedOuts, representing the outputs that will be exported from this chain todestinationChain(2nd last parameter).
All these inputs and outputs are array, and hence con contains multiple outputs or inputs. But you have to manage which output should be passed where.
Call the function by adding the below function call.
_10exportXP()
Run this file using node examples/exportXP.js. A transaction ID is generated upon successful execution.
In the above image, we are consuming UTXO with the amount 0.486..., and
generating outputs with the amount 0.382... (change output) and 0.003 and
0.1 (exported output). The remaining 0.001 is burned as transaction fees.
Import Multi-Sig UTXO From X to Method Chain#
After exporting the UTXOs from the source chain, it stays in the exported atomic
memory that is these are neither on the source chain nor on the destination chain.
Paste the following snippets into a new file importP.js.
Import Dependencies#
We will require ImportTx from PlatformVM APIs.
_14const {_14 djtxAssetID,_14 keyChains,_14 chainIDs,_14 addresses,_14 addressStrings,_14 networkID,_14 BN,_14 platform,_14} = require("../importAPI")_14_14const { UnsignedTx, ImportTx } = require("dijets/dist/apis/platformvm/index")_14_14const { createInputsAndOutputs } = require("../createMultisig")
Send Import Transaction#
The importP() is a simple function that will use UTXOs on the exported atomic
memory as its inputs and create an output on the Method Chain addresses. You can
change the output config's owners and amount as per your need.
An important point to note here is that all UTXOs that are included in this
importTx will be transferred to the destination chain. Even if the import
amount is less than the amount in the UTXO, it will be sent to the qualified
spender on the destination chain as a change output.
_48async function importP() {_48 let memo = Buffer.from("Multisig Import Tx")_48_48 // Use this parameter if you have UTXOs exported from other chains - only exported outputs will be fetched_48 let sourceChain = "Value"_48_48 // unlock amount = sum(output amount) + fee_48 let fee = new BN(1e6)_48_48 let outputConfig = [_48 {_48 amount: new BN(1e6),_48 owners: addresses.p,_48 threshold: 2,_48 },_48 {_48 amount: new BN(1e2),_48 owners: addresses.p[0],_48 threshold: 1,_48 },_48 ]_48_48 // all the inputs here are the exported ones due to source chain parameter_48 let { inputs, outputs } = await createInputsAndOutputs(_48 djtxAssetID,_48 chainIDs.p,_48 addresses.p,_48 addressStrings.p,_48 outputConfig,_48 fee,_48 sourceChain_48 )_48_48 const importTx = new ImportTx(_48 networkID,_48 chainIDs.p,_48 outputs,_48 [],_48 memo,_48 chainIDs.x,_48 inputs_48 )_48_48 const unsignedTx = new UnsignedTx(importTx)_48 const tx = unsignedTx.sign(keyChains.x)_48 const txID = await platform.issueTx(tx)_48 console.log("TxID:", txID)_48}
In the above image, we are consuming the above exported UTXOs with amounts
0.003 and 0.1, and generating outputs with amount 0.092... (change output
imported on Method Chain) and 2 0.005 imported outputs (1 multi-sig and 1
single-sig). The remaining 0.001 is burned as transaction fees.
Import Multi-Sig UTXO From X to Utility Chain#
This transaction will also be similar to other atomic transactions, except for
the outputConfig parameter. You can easily get the idea by looking at the code
below. Before you can run this example, there must be exported outputs for the
addresses you control on the Utility Chain, otherwise, there will be no UTXO to
consume.
Here we are importing UTXOs that are exported from Value Chain.
_59const {_59 djtxAssetID,_59 keyChains,_59 chainIDs,_59 addresses,_59 addressStrings,_59 networkID,_59 BN,_59 evm,_59} = require("../importAPI")_59_59const { UnsignedTx, ImportTx } = require("dijets/dist/apis/evm/index")_59_59const { createInputsAndOutputs } = require("../createMultisig")_59_59async function importP() {_59 // Use this parameter if you have UTXOs exported from other chains - only exported outputs will be fetched_59 let sourceChain = "X"_59_59 // unlock amount = sum(output amount) + fee (fees on Utility Chain is dynamic)_59 let fee = new BN(0)_59_59 let outputConfig = [_59 {_59 amount: new BN(1e4),_59 owners: "0x4406a53c35D05424966bD8FC354E05a3c6B56aF0",_59 },_59 {_59 amount: new BN(2e4),_59 owners: "0x3b0e59fc2e9a82fa5eb3f042bc5151298e4f2cab",_59 },_59 ]_59_59 // all the inputs here are the exported ones due to source chain parameter_59 let { inputs, outputs } = await createInputsAndOutputs(_59 djtxAssetID,_59 chainIDs.c,_59 addresses.c,_59 addressStrings.c,_59 outputConfig,_59 fee,_59 sourceChain_59 )_59_59 const importTx = new ImportTx(_59 networkID,_59 chainIDs.c,_59 chainIDs.x,_59 inputs,_59 outputs_59 )_59_59 const unsignedTx = new UnsignedTx(importTx)_59 const tx = unsignedTx.sign(keyChains.x)_59 const txID = await evm.issueTx(tx)_59 console.log("TxID:", txID)_59}_59_59importP()
You can use Dijets Utility Chain Explorer to view, import and export transactions on Utility Chain.
Add Delegator Transaction#
Till now we have covered common transactions like BaseTx, Export, and Import TX. Export and Import TX will be similar in all the UTXO-based chains like X and P. But for Account-based chains, we have to deal with an account-balance system.
Now let's try using the multi-sig UTXOs exported from Value Chain to Method Chain to
issue an addDelegator() transaction. Create a file addDelegatorTx.js and
paste the following snippets.
Import Dependencies#
Import the dependencies like AddDelegatorTx and UnsignedTx classes using the following code.
_21const {_21 djtxAssetID,_21 keyChains,_21 chainIDs,_21 addresses,_21 addressStrings,_21 networkID,_21 BN,_21 platform,_21} = require("../importAPI")_21_21const {_21 UnsignedTx,_21 AddDelegatorTx,_21 SECPOwnerOutput,_21 ParseableOutput,_21} = require("dijets/dist/apis/platformvm/index")_21_21const { DijetsNodeStringToBuffer, UnixNow } = require("dijets/dist/utils")_21_21const { createInputsAndOutputs } = require("../createMultisig")
Sending AddDelegator Transaction#
Now we will create the addDelegator() function which will use the multi-sig
UTXOs and create a signed addDelegatorTx, which when issued, will add the
delegator to the specified node. Paste the following snippet next.
_52async function addDelegator() {_52 let DijetsNode = DijetsNodeStringToBuffer("DijetsNode-4B4rc5vdD1758JSBYL1xyvE5NHGzz6xzH")_52 let locktime = new BN(0)_52 let stakeAmount = await platform.getMinStake()_52 let startTime = UnixNow().add(new BN(60 * 1))_52 let endTime = startTime.add(new BN(2630000))_52 let memo = Buffer.from("Multi-sig Add Delegator Tx")_52_52 // unlock amount = sum(output amounts) + fee_52 let fee = new BN(1e6)_52_52 // creating stake amount output at 0th index_52 let outputConfig = [_52 {_52 amount: stakeAmount.minValidatorStake,_52 owners: addresses.p,_52 threshold: 2,_52 },_52 ]_52_52 // outputs to be created for rewards_52 const rewardOutputOwners = new SECPOwnerOutput(addresses.p, locktime, 2)_52 const rewardOwners = new ParseableOutput(rewardOutputOwners)_52_52 let { inputs, outputs } = await createInputsAndOutputs(_52 djtxAssetID,_52 chainIDs.p,_52 addresses.p,_52 addressStrings.p,_52 outputConfig,_52 fee_52 )_52_52 const addDelegatorTx = new AddDelegatorTx(_52 networkID,_52 chainIDs.p,_52 [],_52 inputs,_52 memo,_52 nodeID,_52 startTime,_52 endTime,_52 stakeAmount.minDelegatorStake,_52 [outputs[0]],_52 rewardOwners_52 )_52_52 const unsignedTx = new UnsignedTx(addDelegatorTx)_52 const tx = unsignedTx.sign(keyChains.p)_52 const txID = await platform.issueTx(tx)_52 console.log("TxID:", txID)_52}
In the above transaction, the outputs parameter will be empty since we do not need
to transfer any assets to the account. As you can see above we need to create
another type of output, for indicating the reward for delegation.
_10const rewardOutputOwners = new SECPOwnerOutput(addresses.p, locktime, 2)_10const rewardOwners = new ParseableOutput(rewardOutputOwners)
Call the function by adding the below function call.
_10addDelegator()
Run this file using node examples/addDelegatorTx.js, see the txID in the
output, and look for it in the Dijets Unified explorer.